views
Why Do You Need to Factory Reset Your Lenovo Laptop?
While running Windows 10/11, it’s common to confront momentary bugs. However, over time, your Lenovo laptop might become increasingly slower and more susceptible to problems. In cases like this, it’s time to factory reset your Lenovo laptop and start everything fresh.
As the name stands, factory reset refers to a process to clear all data and settings from your Lenovo laptop to its original system state. By doing so, it can solve some recurring system issues and even breathe new life into your computer. In this tutorial, we will show you how to factory reset your Lenovo laptop in 2 different situations, so let’s cut to the chase.
How to Factory Reset Lenovo Laptop?
Preparation: Back up Valuable Data Stored on Your Lenovo Laptop
Since a factory reset might erase all your data, make sure you have all your crucial files, videos, photos, or documents backed up before proceeding. When it comes to backup, MiniTool ShadowMaker might help you out.
As one of the best backup software, not only can it back up files, but data in other forms such as the operating system, selected partitions, and even the whole disk are also supported. Beyond that, MiniTool ShadowMaker enables you to migrate HDD to SSD or move Windows to another drive, which dramatically enhances the performance of your computer.
Now, let’s see how to create a backup of your important files with MiniTool ShadowMaker:
Step 1. Download, install, and launch this freeware.
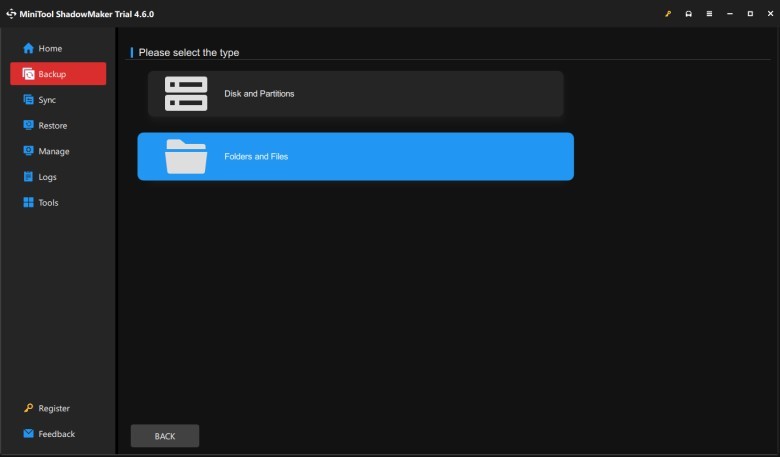
Step 2. Head to the Backup page > select SOURCE > Folders and Files to check the files you wish to protect.
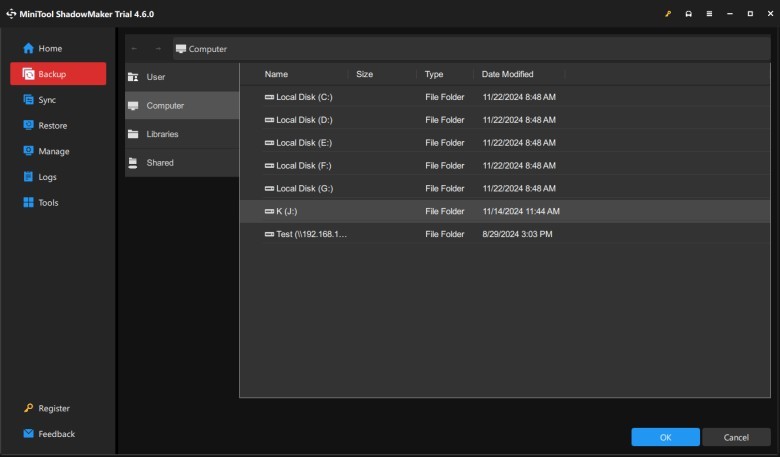
Step 3. As for a storage path, go to DESTINATION to select an external hard drive or a USB flash drive as to storage the backup image.
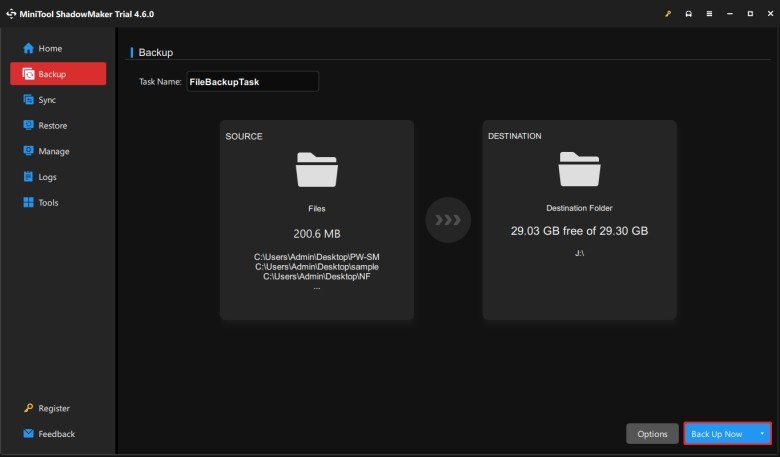
Step 4. After specifying the backup source and destination, click on Back Up Now.
Tip: During the resetting, make sure your Lenovo laptop is plugged into a power socket to avoid potential power outages.
Case 1: Factory Reset a Bootable Lenovo Laptop
When you can boot to desktop, the Windows inbuilt reset option – Reset This PC can help you reset your operating system to the default settings. With its assistance, you can decide whether to delete all the contents or keep your files. Follow these guidelines:
Step 1. Right-click on Start menu and select Settings.
Step 2. Go to Update & Security.
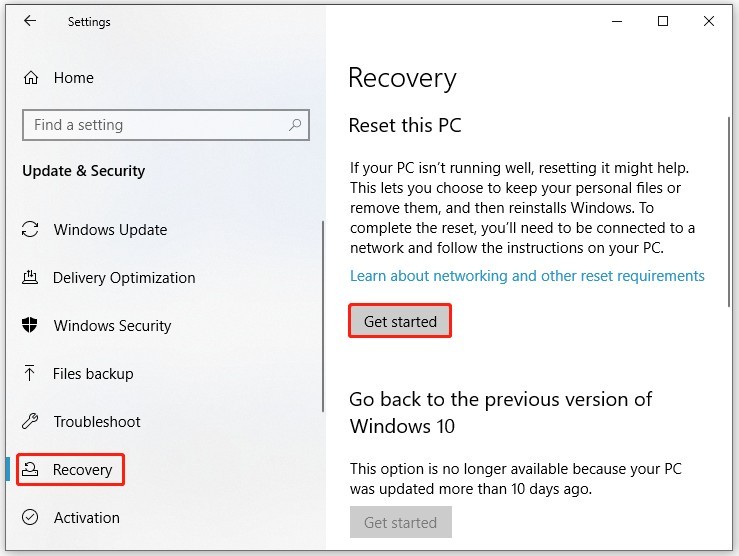
Step 3. In the Recovery section, click on Get started under Reset this PC.
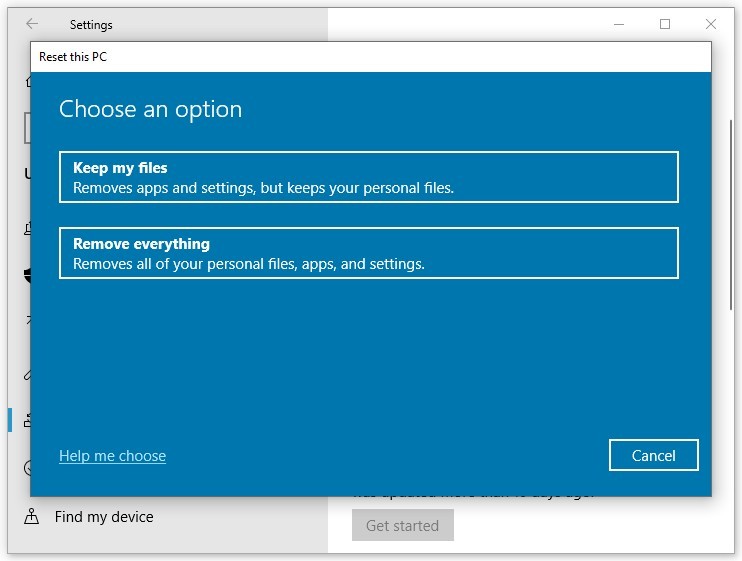
Step 4. Then, there are 2 options in the Choose an option window: Keep my files and Remove everything. Choose one option as per your actual needs.
Step 5. Pick a way to reinstall your Windows: Local download or Cloud reinstall.
Step 6. After making your choice, follow the on-screen wizard to finalize the resetting.
Case 2: Factory Reset an Unbootable Lenovo Laptop
The Novo key is a small circular button usually beside the Power button or on the left side of your Lenovo laptop. When your Lenovo laptop fails to boot, you can utilize it to enter Lenovo OneKey Recovery to perform a system restore or factory reset. Here’s how to reset your Lenovo laptop to factory defaults with the Novo key:
Step 1. Press the Novo button on your computer.
Step 2. In the Novo Button menu screen, use the arrow keys to select System Recovery and hit Enter.
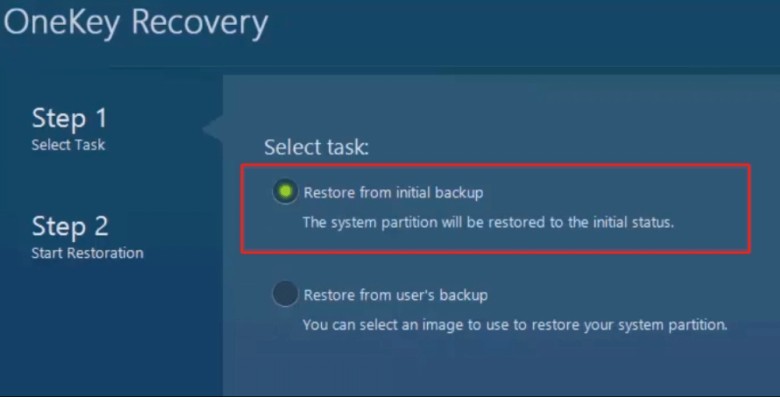
Step 3. Next, your system will boot to the recovery partition. In the OneKey Recovery screen, tick the Restore from initial backup option and then tap on Next to continue.
Step 4. Click on Start and confirm this operation.
Step 5. After completion, the system partition will be restored to the initial status. Restart your Lenovo laptop and set it up from scratch.
Wrapping Things Up
This tutorial demonstrates how to factory reset your Lenovo laptop in 2 cases. No matter if your computer is bootable or not, you can easily reset it to the original configurations. At the same time, the importance of data backup can’t be underestimated, so don’t forget to back up your valuable files with free backup software – MiniTool ShadowMaker. Appreciate your time!




Comments
0 comment