
Got an app idea in your head? Then, get ready to see it live on phones everywhere. Turning your app idea into a real application is a path many have walked, and with the right guidance, you can too!
Mobile app development includes creating apps for Android phones and iPhones. It's about taking a concept and making it functional on these platforms. This guide will break the process down for you.
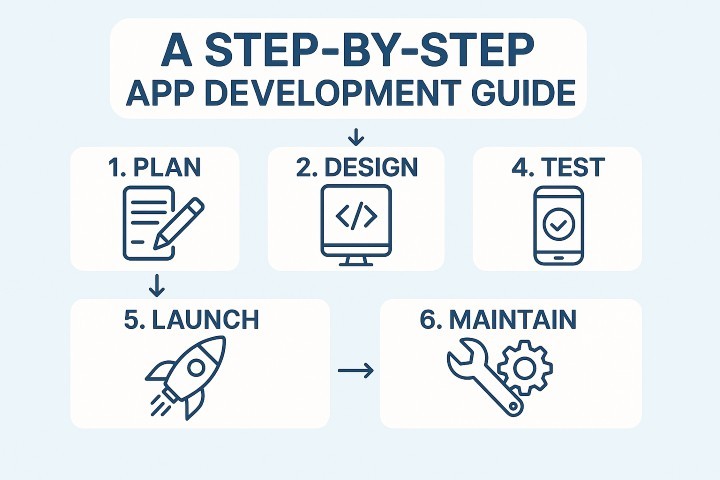
A Step-by-Step App Development Guide: Android or iPhone
From the initial app idea to your app being available for download, several steps are involved.
Step 1: Planning and Research
The first step of mobile app development process is doing proper planning and research that helps validate your app idea. It involves:
● Solidifying Your App Idea: It clearly defines what your app will do, what problem does it solve and what USPs does it offer in line with mobile app development trends and user behaviour.
● Knowing Your Audience: Who are you building this app for? Understand their needs, behaviors and preferences. This will shape your app's features and design.
● Analyzing the Competition: What other apps are out there that do something similar? What are they doing well? Where are their weaknesses? This helps you find your app's unique angle.
● Defining Core Functionality: What are the absolute must have features for your app's first version?
● Considering the Costs: Developing an app involves resources. Consider the mobile app development cost and the time and effort needed. Having a realistic budget in mind is important.
A well-thought-out plan at this stage can make all the difference. Good planning increases your app's chances of success and can provide a strong return on your investment in mobile app development.
Step 2: Designing the App
The design of the app affects how users feel about it. UI and UX are non-negotiables. Here are the key things to consider:
● App Features: Presentation, navigation and layout of your app should make sense and be easy to understand.
● Layout and Navigation: Simple navigation is key.
● App Features: Presentation, navigation and layout of your app should make sense and be easy to understand.
● Layout and Navigation: Simple and intuitive navigation is crucial.
● Mobile User Experience (UX): The flow a user will take within your app should be logical and solve their problem efficiently. A good mobile user experience is a must.
● Brand Identity: Your app should feel like it’s part of your brand. The design elements, colours, fonts and overall style should match your brand’s identity and messaging.
Step 3: Deciding How to Build Your App
You've got your app plan and design ready. Now, how do you actually build it? Picking the right method is a key step. There's no single best way. But understanding your choices helps.
The best approach depends on how complex your app is, your budget and your timeline. Here a few options you will have:
● Native App Development: Build separate native apps. One for Android to launch on Google play store. Another for iOS for apple app store. These apps are built specifically for each system and need different set of development skills as iOS app development is quite different from Android app development.
● Hybrid App Development: Build one app. It can run on different platforms and can be deployed on app stores with a single codebase. This often uses web tech inside a native container.
● Cross Platform App Development: Build one app. It works on many platforms. Special tools create code that runs almost like native apps. React Native is a popular example.
Step 4: Building the App
Now your idea starts to become a reality! Skilled app developers will use various programming languages and tools to build the features and functionality of your app. During this phase, keep an eye on:
● Feature Implementation: Developers will start coding each of the features you defined in the planning stage. This is like seeing the blueprint of your dream house actually being built brick by brick.
● Functionality: Each feature must work as intended. Your app needs to do its core job reliably and efficiently. A beautiful app that doesn’t work is like a beautiful car with no engine!
● Performance: Slow loading times or lag will frustrate users faster than almost anything else. Developers will write efficient code to optimize performance. Remember, users won’t notice when things work perfectly but they’ll definitely notice when they don’t.
● Meeting User Needs: The app’s features and functionality must directly address user needs and provide value. This is what will determine if users will keep using your app or delete it after a day.
A big part of this stage is testing and debugging. As the app is being built, developers will test different parts to find and fix errors or bugs. While it’s tempting to rush through this part (we all get excited to see the finished product!), taking the time to get it right now will save you many headaches later on.
Step 5: Testing Your App
You built your app! Nice! Now, let's check it.
Testing is key. It finds problems early. Think of it as a final check that finds bugs, glitches and ease of use.
What does app testing do?
● Checks performance on diverse devices: It tests on Android and iPhones. Different sizes too. What's good on one might be bad on another.
● Checks Speed: How fast is your app? Does it use too much power? It should be fast.
● Checks Security: Is your app safe? Is user info safe? Safety matters.
● Checks Easy Use: Can people use it easily? Is it simple to understand?
Before your app is launched, you need to do:
● Performance Testing: How does your app perform under different conditions? Does it drain battery quickly? Does it use too much data? Performance testing ensures your app is efficient and responsive even when the user's connection isn't great or their battery is low.
● Security Testing: Protecting user data is absolutely vital in today's digital world. Security testing identifies any vulnerabilities that could be exploited. Users are entrusting you with their information—don't let them down!
● Usability Testing: Is your app easy to use? Is the navigation intuitive? Does it meet the needs of your target audience? Usability testing often involves real users trying out the app and providing feedback. This hands-on testing can reveal issues that developers (who are too familiar with the app) might never notice.
Step 6: Launch & Maintenance
You’ve made it to the final phase—your app is ready to meet the world! But launching is only the beginning. It needs to run smoothly, and ongoing upkeep is essential for it.
● App Store Submission: Before users can download your app, it must be submitted to app stores like the Apple App Store and Google Play. This process involves meeting platform-specific guidelines, preparing assets (screenshots, descriptions, etc.), and waiting for approval.
● Regular Updates: Your app should grow with your users. Release updates to add features, improve functionality, and ensure compatibility with new devices or OS versions.
● Performance Monitoring: Use analytics tools to track usage, crashes, user flow, and engagement. These insights tell you what’s working and what’s not—so you can adapt and evolve accordingly.
Conclusion
Remember the path to the app store isn’t always straight, but with planning and the right approach, it’s totally doable. Every change and decision you make along the way will take some time to implement and perfect.
Some parts will come together quickly, others will take several weeks to refine. Be patient with the process and remember quality is worth waiting for.
Or simply hire a web development company to do it for you!
What's your reaction?


You may also like
-

Why Website Speed and Mobile Design Affect Customer Trust
-
Shillong Teer Result List and Common Number Repetition Patterns
-
Email Quote Requests to the Sales Team Automatically in WooCommerce
-
CBackup Pro Giveaway Campaign
-
AI Video Creator: Your Ultimate Guide to Intelligent Video Production in 2026
-
How to Create a Cancer Care Package Without Overwhelming the Patient


Comments
0 comment